Search This Blog

Tuesday, 21 July 2015

The Best Ever BANOFFEE PIE

Hello world!

Soooo....thinking about what to post next, I felt that after the time consuming yet worth it cake that I posted last week, it had to be something simple this time. Thus came to the mind...BANOFFEE PIE. 

 
Don't worry now, this pie is a piece of cake. Plus, it's a NO BAKE dessert! It is the go to dessert  for one of those midweek sweet cravings when you don't have either time and energy to make an intricate looking dessert.
 
 The word  'banoffee' is a blend of the two words 'banana' and 'toffee', both I love. It is a classic English dessert, first made back in 1972. I just can't stress on how simple the pie is. With just four main ingredients that are easily available anywhere and everywhere, it is perfect for entertaining a large group with minimum effort.

The key to a good banoffee pie is the toffee. While making it, it is important to always keep the can of condensed milk submerged in water if you don't want to be cleaning toffee off your kitchen walls forever. I add some coconut to the pie to give it a tropical feel, but it can be omitted if wanted. Also, make sure not to use overly ripe or very raw bananas. They need to be a little hard, but still have their sweetness. While whipping your cream, do not add any sugar or else the whole pie will be overly sweet. The cream needs to provide a fresh and light feel.
 
One word description of the banoffee pie? Comfort. Decadence. Earthy.
 
 
INGREDIENTS
  1. 200 grams Digestive Biscuits
  2. 3 tbsp. melted Butter (I use salted)
  3. 400 grams can of sweetened Condensed Milk
  4. 1 cup (150 grams) Whipping Cream
  5. 1/2 cup (75 grams) unsweetened, shredded Coconut
  6. Cocoa Powder/ Chocolate Curls
 METHOD
  1. Place the can of condensed milk in a deep pan with boiling water for 2-3 hours. MAKE SURE THE CAN IS ALWAYS TOTALLY SUBMERGED IN WATER. ALWAYS. Let the can cool completely before opening.
  2. Place the biscuits in a food processor and process till they turn into a (nearly) fine powder.
  3. Add the melted butter to the powdered biscuits and process further till the butter is evenly distributed.
    Make sure the biscuit base is nice and even
     
     
  4. Layer the pie with banana slices.
     
  5. Put the prepared toffee on top of the bananas and spread it out.
    I use a spatula. Makes it easier.
  6. Keep in the refrigerator to set for about an hour.
  7. Spread a thick layer of whipped cream on top and dust some cocoa powder or garnish with chocolate curls.
  8. AND VOILA! YOU HAVE TO YOURSELF A PIE! Serve, chilled.


Wednesday, 15 July 2015

The Chocolate Cake (to swear by)

 Hello people of the Earth!

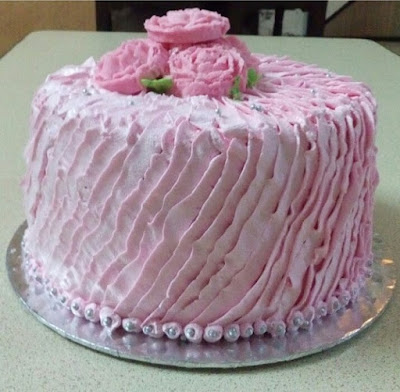
As my first blog I wanted to share something I love the most. What do I love the most you ask? Well, chocolate. And cake. And chocolate mousse. And a pretty chocolate cake with mousse. So...there it is:


Pretty huh? Well, it tastes 10 times better than it looks, I promise. 
And its a hilariously simple cake. Really! All you need is 3 bowls, a whisk, a sieve and measuring equipment. I prefer digital weights because it just makes the process easy and more precise. So grab on to one if possible. It will be a good friend, always.
Back to the cake. It's a chocolate cake with a hint of coffee from Joy Of Baking's 'Simple Chocolate Cake' recipe, adjusted so as to fit the Indian kitchen. Here, I should mention that I am totally in love with Joy of Baking's Stephanie Jaworski. Her recipes are so good! Choose any one blindly. You just know its gonna be perfect.

The batter is very liquidy and that's what makes it so moist. Its is very important to use a (nearly) flavorless oil. I know you might be hearing this the 100th time, but make sure the eggs and butter and milk are at room temperature. It helps them whip up faster and better. Temperature and measurement is key to baking. Just a few grams or degrees here and there can make all the difference. Also, try to find the best quality cocoa powder. I use Hershey's.

Now to the mousse.  Its full of chocolaty goodness. I added chocolate chips for some texture. It's as good if eaten alone. It can be made as a busy weekday dessert for unexpected guests.  However, it needs some time to set.
 
Usually, I start such cakes a day and a half prior to the occasion. In the morning, I bake the cake and let it cool. Then, refrigerate it to harden a little, so as to make splitting it in layers easy. All this takes nearly six hours. You can skip the refrigeration part. Then, I fill the cake with mousse  and let it set overnight. The following day is the most fun. Go wild with decoration! It can be anything from sprinkles to intricate piping. I use whipped cream. Its lighter and fluffier than buttercream.
The cake can be given so many variations. You can add orange zest to the batter. You can brush the cake layers with a strawberry or raspberry jam to provide some contrast to the richness of the chocolate. The batter can also be baked in cupcake shells.The cake can be baked in a loaf or Bundt tin and drizzled with a simple chocolate ganache.
 And these are only 4 of the many 100 possibilities, so get creative!
 
 
The Inside
 
 
INGREDIENTS:
For cup measurements, see notes
 
FOR CAKE
  • 400 grams Castor Sugar
  • 250 grams Cake Flour  (see note 3)
  • 75 grams Cocoa Powder
  • 1 1/2 tsp. Baking Powder
  • 1 1/2 tsp. Baking Soda
  • 1/2 tsp. Salt
  • 3 Eggs, separated
  • 1/2 tsp. Cream of Tartar ( optional)
  • 250 ml Black Coffee (or water)
  • 250 ml Milk
  • 120 ml Oil (Olive/ Corn/ Vegetable/ Canola)
  • 1/4 tsp. Vanilla essence
 
FOR MOUSSE
  • 120 grams Dark Chocolate
  • 30 grams Unsalted Butter
  • 2  Eggs, separated
  • 1/8th tsp. cream of tartar
  • 4 tbsp. Sugar
  • 1/4 tsp. Vanilla Essence
  • 120 ml Whipping Cream
 
FOR ASSEMBLING
  • Whipped Cream
  • Buttercream Roses/ Fresh flowers
  • Pink Food Color
  • Silver Balls
  • Sugar syrup ( 1 cup water +3 tbsp. powdered sugar +1/2 tsp. vanilla)
  • Chocolate chips
  • Standard Rose Tip
  • Piping Bags
NOTE:
  1. For dry ingredients: 1 cup= 200 grams
  2. For liquids: 1 cup=240 ml                                  
  3. Cake Flour: Add 2 tbsp. Cornflour to a cup and fill it with all purpose flour to make 1 cup (200g) cake flour
 
 
METHOD
 
Making the Cake
  1. Preheat the oven to 180 degrees C or 350 degrees F. Butter the sides of your 9 inch cake pans and line with butter (parchment) paper to avoid the cake from sticking.
  2. In a bowl, mix together the sugar, flour, baking powder, baking soda and salt. Sieve the mixture 2-3 times, thus incorporating air.
  3. In another bowl, whisk together egg yolks, coffee, milk, oil and vanilla essence
  4. In a dry, clean bowl, whip the egg whites with cream of tartar till soft peaks form.
  5. Mix the dry and wet ingredients, alternatingly. Do not beat, but fold. You don't want all the incorporated air to escape. Transfer the batter to the baking tin.
  6. Bake in the preheated oven for 45-50 minutes, or until the skewer inserted in the center comes out clean.
  7. LICK THE BOWL.
  8. Let the cake come to room temperature and then refrigerate for 3-4 hours.
Making the Mousse
  1. Make a double boiler by placing a heatproof bowl over a pan of simmering water. Make sure the bowl doesn't touch the water.
  2. Melt the chocolate and butter in the double boiler, and cool for a few minutes.
  3. After the chocolate has cooled, whisk in the egg yolks.
  4. In a dry, clean bowl, whip the egg whites with the cream of tartar till soft peak stage. Add 1 tbsp. sugar and continue beating till sift peaks form.
  5. In another bowl, whip the whipping cream with the remaining sugar till stiff peaks form. Do not over whip.
  6. Combine the chocolate, egg whites and whipping cream, alternating and folding after each addition.
Assembling the Cake
  • Using a serrated knife, split the cake horizontally in the desired number of layers. I did a four layer cake.
  • Place a cake layer on the serving board and soak it with the sugar syrup.
  • Using a piping bag filled with whipped cream, make a thick border on top of the cake. This will prevent the chocolate mousse from oozing out of the cake.
  • Top the mousse with chocolate chips and repeat the process till all the layers hove been assembled.
  • Refrigerate the cake for 5-6 hours or overnight, for the mousse to set.
  • For the decoration, I did a pleated design with pink colored whipped cream. Here's how it's done.
  • Refrigerate the cake for 2-3 hours and serve.
Please do try the recipe and let me know how it was! It is really a recipe to swear by.