Search This Blog

Monday, 13 August 2018

Carrot Cake with Lemon Cream Cheese Icing, Candied Carrot Peel and Caramel Drizzle

Hello people of the Earth!
If you've been on my blog before, you know I absolutely love everything related to cakes. Every time I think of making something for updating the blog, the thought process goes something like this:                                          
  1. This time, I'm definitely gonna make something savory. There's a dominance of cakes on the blog.
  2. *goes through recipe books and magazines for savory inspiration*
  3. So many options. Figuring out a recipe won't be hard this time, for sure.
  4. It's confusing now. I don't know if I should go with the Chinese noodles or the Thai steamed fish or the Italian Pasta.
  5. *meanwhile, goes through cake books, videos and photos.*
  6. There's too much Chinese, Thai and Italian stuff on the internet, anyways.
  7. *thinks about a random reason of celebration in order to bake a cake.*
  8. Maybe, just considering cakes is not that bad an idea. After all, everyone loves cake. Plus, the timing perfectly coincides with my bunny's monthly birthday!
  9. Chuck savory, I'm gonna make a cake. There's just no reason not to, besides a hundred million cake blog posts already existing.                                             
I was off the blog for a long long time. So naturally, I had to come back with something awesome. This carrot cake, believe it or not, is life altering. I know, it is not something that you would normally classify as “gourmet”, or even “fancy”, for that matter, but sometimes, the simplest of things give us the most pleasure don’t they?
Coming back to the topic, yes, life altering. Let me walk you through the ingredients to explain this. a) Using oil instead of butter makes it that extra softer, and prevents it from becoming hard in the refrigerator. Note that any oil can be used, provided it is neutral in flavor. 
b) Yogurt acts as with multiple powers; i) moistening the cake ii) providing extra leavening power by reacting with baking soda (soda plus acid gives out carbon dioxide). 
c) Walnuts are toasted beforehand to proving textural variance. Dusting nuts in a flour to keep them suspended in the batter is one of the oldest tricks in the book, but it works.
d) The brown sugar contains mollases, which helps in retaining moisture for a longer time.
e) The classic cream cheese icing is replaced with a lemon cream cheese frosting which provides a hint of freshness to cut through all the sweet taste.
f) The crisp carrot peel provides yet another textural component.
g) The caramel sauce, in addition to making it look pretty, complements the sponge as well as the icing really well.


CARROT CAKE

INGREDIENTS


METHOD

1. Grease and dust the baking pan/ loaf tin and line it with butter paper.
Preheat the oven to 180 degree Celsius.

2. Combine the flour, baking soda, baking powder and salt with the spices and mix well.

3. Add the walnuts and raisins into the flour mixture and mix so as to coat each piece with flour.

 4. In another bowl, add the brown sugar, yogurt, oil and egg yolks.

5. Mix all the ingredients together to combine.

6. Add grated carrots to this mixture and fold to combine.

7. In a clean and dry bowl, whisk egg whites until they form stiff peaks.

8. Fold in the flour mixture and egg whites into the wet ingredients in three additions. (do not add all together)


9. Transfer the batter to the baking pan and put in the oven immediately. (You see all the air bubbles in the batter? It's precious, you don't want it to escape)
Bake for 40-50 minutes, until a skewer inserted in the center comes out clean.

CREAM CHEESE FROSTING

INGREDIENTS


METHOD

 1. Beat the butter and sugar together until the mixture becomes light and fluffy.

2. Beat the cream cheese until it becomes soft, then add in the butter, lemon juice and lemon zest and mix to combine.

3. Refrigerate the frosting for 1-2 hours, or until it becomes stiff enough to handle.

CANDIED CARROT PEEL

INGREDIENTS

 METHOD

1. Heat the water and sugar until the sugar dissolves.
2. Add the carrot peel and simmer for 10-15 minutes.

3. Drain the liquid and let the carrot peel stand until it is cold enough to handle.
4. Preheat the oven to 100 degree Celsius.

5. Arrange the carrot strips in a lined baking tray, as shown above, and bake until it is dry (not brittle), for about 40-45 minutes.

6. Wind the carrot strips on chopsticks to the shape desired, and return the baking tray to the oven, until the strips get brittle. This should take about 20-30 minutes.

CARAMEL SAUCE

INGREDIENTS


METHOD

1. Heat water and sugar until it reaches an amber color, or until the candy thermometer shows a temperature of 108 degree Celsius. 
2. Remove from heat, add in the cream and stir quickly (but carefully) to incorporate well.
3. Cool the caramel sauce to room temperature to use.

ASSEMBLE THE CAKE

Pipe the frosting on the cake in accordance to your liking. The icing tip I used is as above.

With a spoon, drizzle the caramel on the cake, going from one side to the other.

 Arrange the carrot strips as you like.

I decorated the cake with flowers, you can omit this step freely.

SERVE!😊


Thursday, 14 July 2016

Pineapple Entremet

Hello people of the earth!
Sorry for being missing in action for more than half an year. It was my 12th standard and studies and college entrances were a priority. Also, I didn't make any cool stuff for a really long time so why bother you with just eggs, toast and Maggi huh? Sorry.

So...now that the mandatory apologies and explanations no one asked for are done, lets get to the food, shall we?

Entremet/Entremets  is a French word meaning "between servings". In the French Cuisine, it is a small dish served between courses, or just a dessert. For pastry chefs, it is a multi-layered cake which has different complimentary textures and flavours. (Also, it is pretty to look at!)

I have wanted to make an entremet forever. But making the different layers and assembly and all that stuff takes a fair amount of time and patience. The former I don't use wisely and the latter I lack. In addition to that, I had a hard time in structuring the perfect different layers I wanted in my first entremet. So, After a lot of thinking and scribbling I came up with this tropical themed pineapple entremet.
 
This entremet has a total of nine layers and seven different elements. I made one large entremet
but they can also be made in individual glasses and it would make a delicious trifle as well. The hint of spice provided by addition of ginger in just one layer makes all the difference. Each elements is a dessert in itself, so feel free to make any of the individual seven elements just as they are. Other layers like desiccated coconut, pineapple chunks, mango jelly, mango mousse, etc can be added too as per an individual's liking.


INGREDIENTS AND METHOD


1.Pineapple Cake

What you'll need:


Method

1. Preheat the oven at 180 degree C.
2. Sieve together the flour, baking powder and salt to remove any lumps.
3. Whisk the egg whites with the cream of tartar till soft peak form.
4. Beat the butter and sugar together till the mixture turns pale and fluffy.
5. Add in the egg yolks, one at a time, beating after every addition.
6. Fold in the dry ingredients mixture, the egg whites and milk alternatively, in three additions.
 7. Once the batter is done, pour it into a greased and butter paper lined 9-inch round cake tin (same size as the entremet mould) and bake at 180 degree C for 35-40 min or until a skewer inserted in the center comes out clean.
8. Let the cake come to room temperature and then transfer it to the refrigerator for 1-2 hours to make it easier to cut into layers.
9. Divide the cake into two equal layers using a serrated knife.
***

2.Biscuit Base

What you'll need

Method

1. Mix the crushed biscuits and butter together.
 2. Transfer to a acetate sheet lined lose-bottom tin and press nicely to make an even layer.
***

3. Panna Cotta

Find the recipe, here

NOTE- Halve the recipe for this layer.
 
Once the Panna Cotta mixture has slightly cooled, pour it on the biscuit base and refrigerate for 1-2 hours, until set.
***
 

4. Ginger- Pineapple Jelly

What you'll need

Method

1. Boil the water along with the grated ginger. 
2. Add the jelly crystals and whisk well. 
3. Pass the mixture through a sieve and refrigerate in a round tin of the same size/smaller size than the entremet tin.
***
 
 
 5.  Once the Panna cotta is set, place the first cake layer on top and soak it with sugar syrup.
(2 tbsp. Sugar + 1 glass of water)
***
 
6. Add the layer of the Ginger- Pineapple Jelly.
***

7. Pineapple Cream

1. Whip 500ml of cream and add the desired amount of sugar and pineapple essence.
 (make sure it is not too sweet)
 2. Transfer it to a piping bag and pipe a thin layer of the cream over and around the jelly.
3.Using the back of a spoon spread the icing to cover all the empty spaces.
 

8.Praline

What you'll need


Method

 1. Heat the sugar in a clean, dry bowl till a dark brown caramel is formed.
2. Simultaneously, roast the cashew nuts.
3. Combine the cashews with the caramel.
4. Transfer the mixture to a greased plate and spread it into an even layer using a spoon. Do not touch it till completely cool and hard.
5. Place chunks of praline in a ziplock bag and crush using a rolling pin.
 6. Layer the entremet with the crushed praline.

***

9. Place the second layer of cake and soak it with the sugar syrup.
***
 
10. Cover the cake layer with a thick layer of cream. Refrigerate for 1-1.5 hours.
***

11. White Chocolate Glaze

What you'll need

Method

1. Heat the cream till it comes to a boil.
2. Add the boiling cream to the white chocolate.
3. Keep the bowl undisturbed for 5 minutes, then whisk to melt in the remaining chocolate.
4. Optional: Add a few drops of yellow food coloring and mix it in.
***
 
12. Unmould the dessert.
***
13. Remove the acetate sheet.
***
14. Cover the entremet with a layer of icing and smooth it out with a spatula dipped in hot water.
***

 15. Glazing

 Pour the glaze over the dessert and let it drip through the sides.
Refrigerate.
 

16. White Chocolate Nests

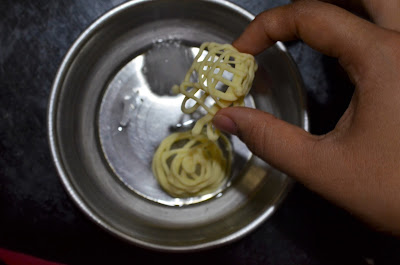
 1. Pipe white chocolate on ice cubes in different patterns and put them in the freezer for 2-3 minutes.
 The nests will come out smoothly.
***
 
Decorate the cake with praline and chocolate nests.
Cherries can be added for some contrasting color.
Done!